Hello world!

Hi everyone 🙂

My name is Nikola Malovic, and I dream of making the best accounting application for nano companies which I have been trying to reach for a very long time as a hobby working on nights and weekends.

A few weeks ago, I decided to restart the work on Papiri again using the latest & greatest tech in the Microsoft world, and the experience so far has been both exhilarating and frustrating.

NetCore is a fantastic platform, Azure is a fantastic cloud platform, and I love Xamarin, but the documentation and specific how-tos are not so great (especially compared to the javascript world where I’ve been living for the last few years)

So, here we go – I’ll share on this blog the specific ways I overcame specific challenges in building my hobby app Papiri, and I hope it will save someone the hours of frustration I had to go through to get to those outcomes.

Buckle up, Dorothy, there’s a tornado coming…

How to: create a lookup column using Adazzle React Data Grid?

Papiri application is having a multiplatform client where the web one was done using React and for grid data representation and entry, we are using the really nice Adazzle React Data Grid components which are providing us Excell style data grid.

There are a lot of examples on their demo page but there is no example for something which is IMHO quite usual use case for data entry – lookup columns.

What is the problem you are solving?

Imagine that in your system, you have three UserType entities:

  • ID: 1, Text: Admin
  • ID:2, Text: User
  • ID:3, Text: Guest

Imagine that you have a User entity that has a property UserTypeId which holds the ID values as data are in normalized form – something like this

ID: 10, Name: John Doe, UserTypeID: 1, Code: A10
ID: 20, Name: Jane Doe, UserTypeID: 2, Code: A11

There are two goals:

  1. Show a table where we will see the list of users with user types showing the text values
  2. Provide a way for the user to select a user type from a list showing the user type texts. Even user types the text the result of the selection should still be that user.UserTypeId will have the newly selected user type ID and not user type Text.

(To keep the post as short as possible, complete code sample can be seen here: https://codesandbox.io/s/92m35nm3jr and the post will just highlight only the important parts.)

Data binding the table

Once you fetch the list of users from the backend service you end with an array of Users which you can map to a collection of columns where a column key points to a property to which table should bind so all that is left is to map those two in the data grid definition

const userTypes = [
  { id: 1, title: "Admin" },
  { id: 2, title: "User" },
  { id: 3, title: "Guest" }
];

...

const users = [
  { id: 10, code: "A10", name: "John Doe", userTypeId: 1 },
  { id: 11, code: "A11", name: "Jane Doe", userTypeId: 2 }
];

...

const columns = [
  { key: "code", name: "Code", width: 80 },
  { key: "name", name: "Name", editable: true },
  { key: "userTypeId", name: "Type" }
];

...
  constructor() {
    super();
    this.state = {
      rows: users
    };
  }

...

<ReactDataGrid
   ... 
   columns={columns}
   rowGetter={this.rowGetter}
   rowsCount={this.state.rows.length}
/>

...

rowGetter = i => { return this.state.rows[i]; };

And that is pretty much it – a piece of cake.

Formatting the data

The problem we are going to tackle now is the fact that Type column shows user type id and not text which is not a very human-friendly solution 🙂

In order to do that we need to format the table cell representation which  is likely another very simple thing to do – just a small component needed

const TypeFormatter = (props) => {

  const userType = userTypes.find(p => p.id === parseInt(props.value, 10));
  const text = userType ? userType.text : props.value;

  return (
    <span>{text}</span>
  );
}

As you can tell from this code the component expects props with a value field which will carry on the value bound to the column which in case of typeId column will be an id: number

Once we have this formatter defined, we just need to attach it to a column where it will be used for rendering the display values.

const columns = [
  ...
  { key: "userTypeId", name: "Type", formatter: TypeFormatter }
];

And that’s it – the type shows now text instead of id

Editing the lookup values

So let us add an ability to make John Doe be a Guest instead of admin by adding an auto-complete drop-down editor.

In order to do that we need to define editor component

const getUserTypeText = value => {
  const userType = userTypes.find(p => p.id === parseInt(value, 10));
  return userType ? userType.title : value;
};


const UserTypeEditor = (
  <AutoCompleteEditor
    options={userTypes}
    valueParams={["id"]}
    editorDisplayValue={(col, val) => getUserTypeText(val)}
  />
);

A little bit about the code:

  • we have set the options to an array of user types – data source of lookup values
  • editorDisplayValue is having an inline function defining what value will be shown initially when the drop-down editor is activated and as we want to show  „Admin“ instead of „1“ we need to tweak editor display value
  • valueParams contains the name of the property which will be used to set the state of the cell after selection. For example, I would enter „Guest“ in the auto-complete editor but the value set on the state will be still „3“. Without this property the user.UserTypeId will be „Guest“ which we don’t want.

And that is pretty much it, all that is needed to create an auto-complete lookup column in great Adazzle React Data Grid.

How to: Run Sql Server and Redis using Docker on Windows

Sql Server is great and so is Redis but once I install them on my DEV machine they take (at times significant) amount of PC resources so I’ve switched to Docker-based solution which is simple to set up and it solves this problem.

Basically, you need to execute this 3 simple steps:

  1. install Docker (just run the installer from https://store.docker.com/editions/community/docker-ce-desktop-windows)
  2. Install Sql 2019  Linux docker image by following next steps
    After this steps you will be able to connect to the server using Managment Studio and/or Entify Framework is using it normally.
  3. Pull redis docker image (docker pull redis) and run it locally with this command
docker pull redis

docker run  -d -p 6379:6379 redis

Then in your appsettings.json just put „localhost“ for redis server address and you are done.

The two things I like about this approach to setting up my DEV box:

  •  If the docker containers are not running there is no impact on the hosting PC
  • I can use the same simple setup for my windows and mac dev machines

Gotcha: OPTIONS preflight call getting 401 Unauthorized

This one is a quite stupid problem but as it took me 2 hours to figure it out I’ve decided to write it down.

The problem was related to the fact that on a given controller I had a method

public async Task<LookupData> GetAsync()

which I expected based on my WebAPI v1 days to be HttpGet ONLY by convention.

What I have learned is that is not the case in AspNetCore so this method was triggered also by CORS preflight OPTIONS call and that caused all kind of troubles.

Solution to my problem ended very simple – add a [HttpGet] attribute

[HttpGet]
public async Task<LookupData> GetAsync()

I somehow don’t like to use attributes when I don’t really have to but in this case lesson learn – annotate your AspNetCore controller methods! 🙂

How to override AspNetCore LogLevel from aspsettings.json on Azure App Service?

Here is a post about something which is very dumb  yet it cost me a few hours to figure it out – how to override the Logging configuration from appsettings.json file on the Azure App Service settings?

Basically, you might have your AspNetCore app configured like this

{
  "Logging": {
    "LogLevel": {
      "Default": "Information",
      "Microsoft.AspNetCore": "Error" 
    }
  }
}

It is very simple config – do not show any logs for anything which is less than error (for AspNetCore logs) and nothing below the Information for the rest of the code logging traces.

The problem is that you may have in your code things like this

this.logger.LogDebug("[Group]:message" + JsonConvert.SerializeObject(creationEvent, Formatting.Indented));

You want to take a quick look but without redeploying the app – how to do that?

After 2 hours of searching, it turns out to be quite simple rule for overriding ANY setting.

Replace every { in the appsettings.json file with : in azure app settings

So just add a new Azure App Service setting  with key Logging:LogLevel:Default  and set it to Debug value and once done remove it.

How to use Azure Traffic manager with custom domains and SSL?

Howdy!

Here is a short „lessons learned“ blog post about a thing which: a) seems not have an updated blog post, stack overflow etc, b) wasted a day of my life and c) turned to be quite trivial once I figured out how to do it.

Basically, as Scott Hanselman blogged about a long time ago you might have users distributed around the globe in which case you would like them to use resources which are close to them and improve their perf. Or another use case is that auto-scale up/out capabilities of the single App Service are not enough and you would like to use multiple app services supporting your website.

Well if this sounds interesting, I have good news – like many other things with Azure this one turns out to be quite simple so let me show you how to set up SSL balancing with custom names using Azure Trafic manager.

Step 1 – create app services which will distribute the load

For the purpose of this blog post, I will create two app service: one in US and one in Europe data center with the idea that all of the users who are in US will be hitting the US app service and all the other users will use the EU app service.

There are many other use cases other than the typical geo distribution one like for example auto scale-out capabilities of a single app service are not sufficient, getting phased rollouts without using the slots, a/b tests, complying with the data sovereignty mandates etc…

Step 2 – create azure traffic manager endpoint

We need a single URL address which will then route traffic to the app services and one way to achieve that in Azure is by using the Azure Traffic Manager.

Hit that little plus, search for Traffic and – voila!

Two important things on this screen:

  • name – defines the unique public URL which will be called by service consumers and which will then go to individual app services
  • routing method  – there are 4 different ways how the app service routing can be driven where the most commonly used is the performance one but just for the kicks, I am going to use in my post Geographic one.

Now open traffic manager endpoint and do yourself a favor, open configuration and enable https only traffic

Step 3 – map the app services to the traffic manager

We need to inform traffic manager where it can redirect the traffic – go to the Endpoints/Add

And there define what app service should be used by which geographical area.

As we said for this example US service will handle North America traffic and EU service the rest of the world.

This definition is specific to Geographic routing and it can be specified to smaller geographic areas – for example, you can have app service for the state of New York 

Now quickly the other app service which should take all the traffic which is not from North America

And that’s it – if you would hit the traffic manager endpoint from different parts of the world you would see that different app services are handling the traffic

Is that it?

Well on most of the blogs this will be sufficient but as I always take care of both of my blog subscribers I will explain here how to take the things explained so far and elevate them to something really usefull in real world 🙂

Step 4 – Define CNAME mapping for the traffic manager

While you can use the url with its trafficmanager.net domain for demos, it is totally lame to use it in production for your product so we are going to define a CNAME mapping which will allow us to access it through our domain.

Here is how that setting looks like with my DNS provider

So everyone hitting blog-api.papiri.rs will be hitting the papiri-tm.trafficmanager.net which will then route traffic to the app services.

Step 5 – magic (define custom names for all of the app services)

In this step, we are going open all of the app services  which are mapped to traffic manager and set their custom names to the same one mapped through DNS in step #5

The fact this works is magical as there were no DNS mapping defined for the app service itself but the validation passes. This works due to the fact that traffic manager is not a real load balancer but more of another DNS entry so the DNS mappings defined for the manager are valid also for the app services mapped to it!

Step 6 – add SSL bindings to the app service

We then go through each one of the app services and upload SSL certificate (Scott Hanselman recently blogged on how to get a free SSL cert for your site) 

Once the SSL certificate is uploaded to the app service, we can define app service SSL binding

Step 7 – a final test that everything works fine

If you did all the steps, you should be done and you can hit your custom domain using https and verify the app service balancing of your custom domain using the www.whatsmydns.net

That’s it folks!

How to add LinkedIn login to your Asp.Net Core app?

If you are of human origin, then most likely you hate remembering all the passwords different websites are forcing you to remember.

(Yes, I use LastPass but still, it is a major PITA)

That is why we have OAuth providers which allow us to login using Facebook, Microsoft, Google and plenty of other social providers which we use anyhow.

As I said previously, on this blog post I treat all of my readers with respect so I will save you 20 minutes of your life by repeating to you basic stuff like what OAuth is and how you can add to your Asp.Net Core app Facebook login.
(In case you would need that: here it is)

Here I will speak about a problem I hit recently: the list of build in providers is limited and we can’t really use the popular .NET 4.6.2 NuGet packages so the question emerged…

If you are busy and just want to have AddLinkedIn() in your code and don’t care about how it works you can either get the source code from my GitHub repo or add a Nivatech.Framework.OAuthProviders Nuget package to your project.

If you want to learn how to make your own OAuth provider for Asp.Net Core just keep reading…

How to add LinkedIn OAuth provider to Asp.Net Core app?

Like many of the things in asp.net core  – making your own LinkedIn (or any other) OAuth provider it turns to be a quite an easy task done in 3 simple steps.

First of all, you need to find some data about OAuth endpoints the provider you want to use exposes. This is always an easy task which takes 10 minutes of Binging with Google as each one of the providers has that publicly documented.

In case of LinkedIn, this is documented on their OAuth documentation page so we will take from their 3 endpoint URLs we need and make out of it LinkedInDefaults class

public static class LinkedInDefaults
{
    public static readonly string DisplayName = "LinkedIn";
    public static readonly string AuthorizationEndpoint = "https://www.linkedin.com/oauth/v2/authorization";
    public static readonly string TokenEndpoint = "https://www.linkedin.com/oauth/v2/accessToken";
    public static readonly string UserInformationEndpoint = "https://api.linkedin.com/v1/people/~:(id,formatted-name,email-address,picture-url)";
    public const string AuthenticationScheme = "LinkedIn";
}

The second step is to define OAuthOptions file for LinkedIn provider like this

public class LinkedInOptions : OAuthOptions
{
    public LinkedInOptions()
    {
        this.CallbackPath = new PathString("/signin-linkedin");
        this.AuthorizationEndpoint = LinkedInDefaults.AuthorizationEndpoint;
        this.TokenEndpoint = LinkedInDefaults.TokenEndpoint;

        this.UserInformationEndpoint = LinkedInDefaults.UserInformationEndpoint;
        this.Scope.Add("r_basicprofile");
        this.Scope.Add("r_emailaddress");

        this.ClaimActions.MapJsonKey(ClaimTypes.NameIdentifier, "id", ClaimValueTypes.String);
        this.ClaimActions.MapJsonKey(ClaimTypes.Name, "formattedName", ClaimValueTypes.String);
        this.ClaimActions.MapJsonKey(ClaimTypes.Email, "emailAddress", ClaimValueTypes.Email);
        this.ClaimActions.MapJsonKey("picture", "pictureUrl", ClaimValueTypes.String);
    }
}

A few points about this code sample:

  • The callback path is in every provider defined as /signin-SCHEMA_NAME
  • I am defining explicitly the scopes which you can decide to skip and just rely on the company settings defined in the LinkedIn portal
  • The last few lines of code are defining mappings between properties LinkedIn provider is using and the claims you want to store them under.

How can you possibly know what properties certain OAuth provider uses?

Good question – let me show it in the LinkedInHandler file – a 3rd piece of our LinkedIn asp.net core OAuth provider

public class LinkedinHandler : OAuthHandler<LinkedInOptions>
{
    protected override async Task<AuthenticationTicket> CreateTicketAsync(ClaimsIdentity identity, AuthenticationProperties properties, OAuthTokenResponse tokens)
    {
        // Retrieve user info
        var request = new HttpRequestMessage(HttpMethod.Get, this.Options.UserInformationEndpoint);
        request.Headers.Authorization = new AuthenticationHeaderValue("Bearer", tokens.AccessToken);
        request.Headers.Add("x-li-format", "json");

        var response = await this.Backchannel.SendAsync(request, this.Context.RequestAborted);
        response.EnsureSuccessStatusCode();

        var content = await response.Content.ReadAsStringAsync();
        var user = JObject.Parse(content);

        OAuthCreatingTicketContext context = new OAuthCreatingTicketContext(new ClaimsPrincipal(identity), properties, this.Context, this.Scheme, this.Options, this.Backchannel, tokens, user);
        context.RunClaimActions();
        await this.Events.CreatingTicket(context);
        return new AuthenticationTicket(context.Principal, context.Properties, this.Scheme.Name);
    }
}

Do you see the line where we parse content into user object? That is the place to put your breakpoint and check what keys json content contains and then you can map them in options as mentioned previously.

So everything is in place and all we need is to create nice extension method where we map options, handler and authorization schema/provider name

public static class OAuthExtension
{
    public static AuthenticationBuilder AddLinkedin(this AuthenticationBuilder builder, Action<LinkedInOptions> linkedinOptions)
    {
        return builder.AddOAuth<LinkedInOptions, LinkedinHandler>("LinkedIn", linkedinOptions);
    }
}

And that’s it – from this moment you can use the LinkedIn provider as any other built-in OAuth provider

services.AddAuthentication()
    .AddLinkedin(options =>
    {
        options.ClientId = this.Configuration.GetValue<string>("LIN_CLIENT");
        options.ClientSecret = this.Configuration.GetValue<string>("LIN_SECRET");
    });

Adding support for other OAuth provider is pretty much the same set of steps (I needed support for GitHub provider so I added it to my GitHub repo) so you should be able to create your own with an ease after reading this article.

Off course if you want to add your providers to the repo so more people can benefit out of it you are more then welcome

What is the best way to store secrets using Azure Key Vault?

As I said already, you should NEVER store passwords in any file going to your Git repo – there is a circle in Dante’s hell just for people doing that 🙂

Up until recently you had a few options to store secrets where the most used one was to store them in Application settings of your Azure App Service (there is another circle for people still using cloud service/VMs in 2018) and then during the runtime app service will override the local dev settings with the appropriate environment ones.  That is a bit better as now you don’t have to be afraid of anyone having access to your repo that just about anyone having access to the Azure Portal with services.

To make this even safer Microsoft created a secure storage called Azure Key Vault to which you move all the secrets from Application Settings and now only folks who have access to Azure Key Vault can see them.

The problem is now how to authenticate with Key Vault and the only solution up until a few  months ago was to  use Azure Key Vault from a web app using client secret which basically meant that you have to store your Key Vault password into the Application settings which kind of made the whole purpose of Key Vault questionable as anyone having access to App settings will get the password for Key Vault and 3 minutes later access to the secrets there.

Alas, do not despair, my dear reader, as little thinker fairies from Microsoft Azure team invented Azure Active Directory Managed Service Identity (MSI) just so we can secure our secrets in a worry-free way.

So what is MSI and how it helps with the problem?

Good question!

Basically, the idea is here that you make an AAD account for your app service with secret credentials not shown anywhere on the portal and then you grant Azure Key Vault access rights to that account so without any secrets stored anywhere your app service will be authorized for Key Vault access.

How to create AAD account for your app service?

Easy peasy! Open your app service and scroll the settings until you find Manage service identity one click On and Save – that’s it.
Here is how I did that on my app service called keyvault-demo

How to authorize managed service identity to access Key Vault?

Also easy (you have to love new MS/Azure stack – superb simple and strong stuff) – open or create Key Vault, click on Access Policies and then click on Add.

Here is how I did that on my key vault called nivatech-demo

On the Add access policy first select the template what the app service should have access too (I’ve given it in this blog post access to everything (keys, secrets and certs) , then click Select principal list item and in the search box on the right side enter the name of app service MSI you want to authorize (in this blog post keyvault-demo) and then click Select.

Don’t forget to click Save on the next screen 🙂

Et voila! Your app service can now access key vault and read keys/secrets/certs.

Can I see the sample of the code reading the value from Key Vault using this MSI thingy?

Oh, sure – it is quite simple.

Let say we want to store in our key vault a secret which will be used for JWT authorization in a key called jwt-secret-key and with value Y31n55o835dv2CpSAKsErqVUqkNb42P0.

In Key Vault find Secrets and click Generate/Import button.

And then fill the fields with the key name and value

(The story about the need of rotating keys will have to wait for some other time so we will not set any expiration date here)

How can I retrieve the value from Key Vault in my service?

The best way is to add KeyVault as a configuration provider and then the value will come out of the simple usage of IConfiguration as all the other config values.

The way how I do this in Papiri application is by modifying Program.cs file to be something like this

public class Program
{
    public static void Main(string[] args)
    {
        
        var builder = WebHost.CreateDefaultBuilder(args);

        //Add CacheKey Vault to configuration pipeline
        builder.ConfigureAppConfiguration((context, configBuilder) =>
        {
            // vault host address - you can get the value from app settings
            var vaultHost = "https://nivatech-demo.vault.azure.net/";
            
            //Create Managed Service Identity token provider
            var tokenProvider = new AzureServiceTokenProvider();
            
            //Create the CacheKey Vault client
            var kvClient = new KeyVaultClient((authority, resource, scope) => 
                            tokenProvider.KeyVaultTokenCallback(authority, resource, scope));
            
            //Add CacheKey Vault to configuration pipeline
            configBuilder.AddAzureKeyVault(vaultHost, kvClient, new DefaultKeyVaultSecretManager());
        });
        

        builder
            .UseApplicationInsights()
            .UseStartup<Startup>();
        builder.Build().Run();
    }
}

and that’s pretty much it – anywhere in your code you can do now

var keyFromVault = this.configuration.GetValue<string>("jwt-secret-key");

Wow, this is super cool but how can I run this code on my dev box?

I don’t use KeyVault locally (I prefer user secrets) but if you want to use it it is easy and all it is need is a few steps:

  1. Go to Key Vault / Access Policies / Add New and add yourself.

    My subscription is tied to my Microsoft Account (MSA) and I use the same to login to my dev box but this works the same if you are using AAD accounts.
  2. Install on your dev machine azure CLI 2.0
  3. Then run az login  command on your dev box to and login with the same account from #1 to your Azure subscription
az login

That’s it – the code snippet from above should now work on your local box too!

Questions/Comments/Corrections/Suggestions – more then welcome 🙂

(In some of the future posts I will share how I secure in my Papiri application using MSI secret access to blob storage and service bus)

How to run Azure app service with Asp.Net Core 2.2 Preview?

So, you like Asp.Net Core 2.2 Preview as much as I do and you want to deploy your website to Azure as app service – easy peasy, right?

Not so fast cowboy! 🙂

Asp.Net Core 2.2 is ATM still in Preview and in order to be able to deploy it to Azure service you need to add 2.2 runtime extension.

First, open your app service and find Extensions section and click add

Then you find Asp.Net  Core 2.2 Runtime extension select it and accept EULA

After a few seconds, the extension is installed and your 2.2 websites are working fine now deployed on Azure.

So go and get that cup of coffee you deserve for a job well done!

How to protect API with JWT tokens in Asp.Net Core

Unless you are a time traveler and just landed in 2018, the app you are working on is using for sure some REST API (we’ll skip GraphQL for now) to CRUD the data it works with.

My preferred technology for implementing such an API is  Asp.Net Core WebAPI so creating endpoints is quite a trivial task.

Protecting the endpoints from the unauthorized access is, unfortunately, a bit less trivial task but still easy in Asp.Net Core compared to how it was done in the past.

In Papiri we are using claims-based authentication using the JWT bearer tokens.

What is JWT?

JSON Web Tokens are an open, industry standard RFC 7519 method for representing claims securely between two parties. It is a de facto standard on the web for performing authorization which is not dependent on any technology or platform. If you check out the https://jwt.io/ you can see libraries in many different languages.

Basically JWT token is a base64 encoded string which consists of 3 parts separated by dots – like this one

eyJhbGciOiJIUzI1NiIsInR5cCI6IkpXVCJ9.eyJzdWIiOiIxMjM0NTY3ODkwIiwibmFtZSI6IkpvaG4gRG9lIiwiaWF0IjoxNTE2MjM5MDIyfQ.XbPfbIHMI6arZ3Y922BhjWgQzWXcXNrz0ogtVhfEd2o.

You can take this string and paste it on jwt.io to see what it contains…

The first part of that string is called header and it contains things like what algorithm and token type are used.

The second part of the string contains set of claims which we want to be sent as a part of the JWT token. Purpose of this part is to define claims which we want to be part of principal claims once the authorization is complete on API side.

The third part is a signature part which is an encrypted checksum of the previous two sections. Purpose of this part is to verify that the claims sent to the backend have not been tampered and thus making token invalid.

How to create JWT token?

First of all, you need app secret key which you will use to encrypt JWT signature. You DO NOT put that in your git repo, config files etc as if someone will get a hold of it he would be able to generate JWT token with any set of claims impersonating different roles etc.

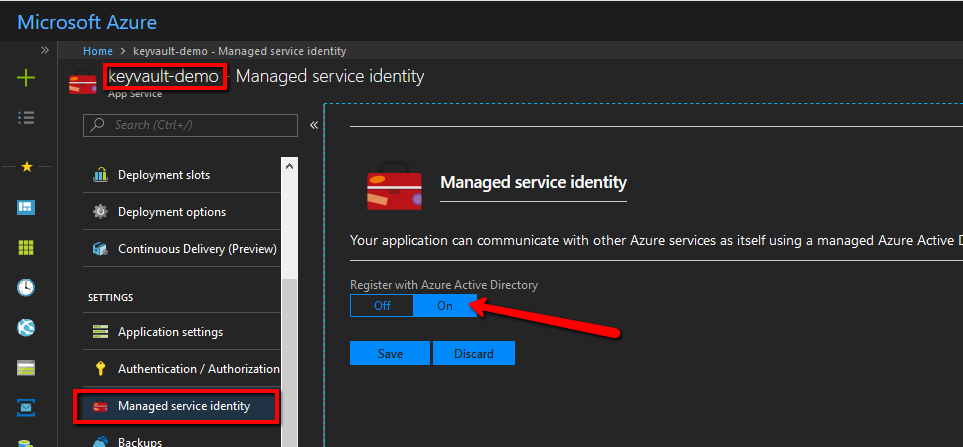
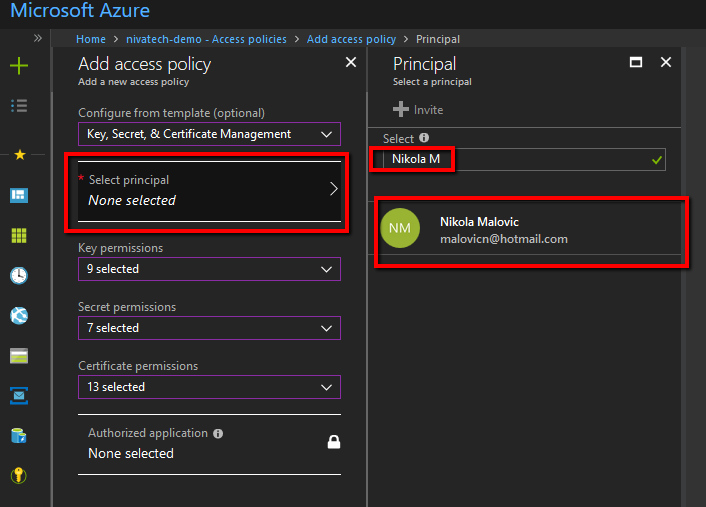
(You should store app secret it in Azure Key Vault but how to do that is part of some of the future blog posts)

var key = new SymmetricSecurityKey(Encoding.UTF8.GetBytes(secret));
var creds = new SigningCredentials(key, SecurityAlgorithms.HmacSha256);

Once we transform the secret into the credentials object we need to define the set of claims which will be sent in jwt token – here are claims we use in Papiri app

var claims = new List<Claim>()
{
    new Claim(JwtRegisteredClaimNames.Sub, user.Id.ToString()),
    new Claim(JwtRegisteredClaimNames.UniqueName, user.Email),
    new Claim(JwtRegisteredClaimNames.GivenName, user.FirstName),
    new Claim(JwtRegisteredClaimNames.FamilyName, user.FamilyName),
    new Claim(JwtRegisteredClaimNames.Jti, KeyGenerator.GetSecureGuid().ToString()),
    new Claim(JwtRegisteredClaimNames.Iss, issuer),
    new Claim(JwtRegisteredClaimNames.Iat, DateTime.UtcNow.ToEpochMillis().ToString(), ClaimValueTypes.DateTime),
    new Claim(JwtRegisteredClaimNames.Email, user.Email)
};

A few thoughts about the claims:

  • You always need to have jti claim set to some random value on every token generation as a form of salting the signature which makes it harder for cracking
  • iat claim is the claim which represents when the claim is issued at and you can then set the expiration policy which will invalidate claim after x seconds for example which reduces the risk of someone stealing the token and using it in issuing its own calls.
  • As you can tell we send also a few data describing the user in more details which we need to simplify our microservice architecture and avoid cross service authorization calls.

All right, credentials and claims are ready so lets define the token expiration and create it!

var expires = DateTime.Now.AddMinutes(1);

var jwtSecurityToken = new JwtSecurityToken(
    expires: expires,
    claims:claims,
    signingCredentials: creds);

string token = new JwtSecurityTokenHandler().WriteToken(jwtSecurityToken);

And there we are – we got the signed JWT token containing our claims.

How to send JWT token with API requests?

The best approach is to send it in Authentication request header in a form of Barer token – something like this

Authentication: Bearer JWT_TOKEN_GOES_HERE

In C# this is usually done like this

using (var client = new HttpClient())
{
     client.DefaultRequestHeaders.Authorization = new AuthenticationHeaderValue("bearer", token);
     ...
}

How to authorize API calls with JWT bearer authentication header?

So now there is a call hitting your endpoint with the bearer token, how to use that in your endpoint? In Asp.Net Core that is super easy!

In your Asp.Net Core Startup.cs class find the ConfigureServices method and add this code there

services.AddAuthentication(JwtBearerDefaults.AuthenticationScheme)
    .AddJwtBearer(cfg =>
    {
        cfg.TokenValidationParameters = new TokenValidationParameters()
        {         
            ValidateAudience = false,
            ValidateIssuer = true,
            ValidateLifetime = true,
            ValidateIssuerSigningKey = true,
            ValidIssuer = issuer,
            IssuerSigningKey = new SymmetricSecurityKey(Encoding.UTF8.GetBytes(APP_SECRET_HERE))
        };
    });

One more time: do not put app secret in your code – this is just demoware sample – wait until I describe how to store it properly in Azure Key Vault in next blog post 🙂

One more line needed to be added to Configure method

app.UseAuthentication();

Now when we have this set all we need to do is to put the [Authorize] attribute on controller we want to protect and that’s it!

If the token is valid the claims will be transferred to the set of claims User property controller has inside the action and you are good to go!

There you go – crash course in JWT tokens in Asp.Net Core!

Real-user monitoring for Accessibility, Performance, Security, SEO & Errors (SiteLint)